

APA - The Engineered Wood Association has introduced the seventh article in its Builder Tips series of publications:
Plywood and OSB are ideal materials for roof sheathing systems ranging from simple single-family residences to large commercial buildings.
What is roof sheathing?
A roof system consists of several elements working together to protect the home. Roof sheathing (or roof decking) is one of those elements. In the U.S., it is almost always composed of wood—usually OSB (oriented strand board) or plywood. OSB is lightweight, relatively inexpensive, and strong enough to resist bending or breaking should someone walk on the roof. Plywood is a bit more expensive, but is usually stronger and is often selected in cases where the roof covering is heavier, such as for slate, clay, or concrete tile roofs.
Follow these 5 simple construction steps when installing roof sheathing:
(and scroll down to see more details on each, with installation hints and tips, below)
Step 1: Check the nailing surface is level
Step 2: Ventilate the roof according to current building codes
Step 3: Properly fasten panels (including fastening and spacing hints)
Step 4: Cover roof sheathing with shingle underlayment felt
Step 5: Install shingles according to manufacturer recommendations
Step 1: Always Check for a Level Nailing Surface
This can be done with a straight piece of lumber (6 feet to 10 feet long) or a long carpenter’s level. Trusses or rafters should be shimmed as necessary to provide a level nailing surface. If the top chords of trusses or rafters are warped or bowed, install blocking to straighten.
RELATED
- Roofing Products: Asphalt Still Tops, Metal Growing in Popularity
- 10 New Roofing Products to Spruce Up Home Exteriors
- New Retrofit Design Guide for Metal Roofing
- More articles about roofing and roofing products
Step 2: Provide Roof Ventilation According to Building Codes
Roof ventilations hints:
- A minimum net free ventilation area of 960 square inches for each 1,000 square feet (1/150th) of the ceiling area is required. Net free ventilation area may be reduced to a minimum of 480 square inches for each 1,000 square feet (1/300th) when certain building code provisions are met (see Section R806.2 of the 2012 International Residential Code or Section 1203.2 of the 2012 International Building Code for more details). Note that these are minimum code requirements, which have been found to be adequate under most normal circumstances.
- Vent exhaust air from kitchens, baths, and laundry to the outdoors with vent pipes that run through the roof cavity or attic to roof ventilators. Do not vent exhaust air directly into roof cavity or attic.
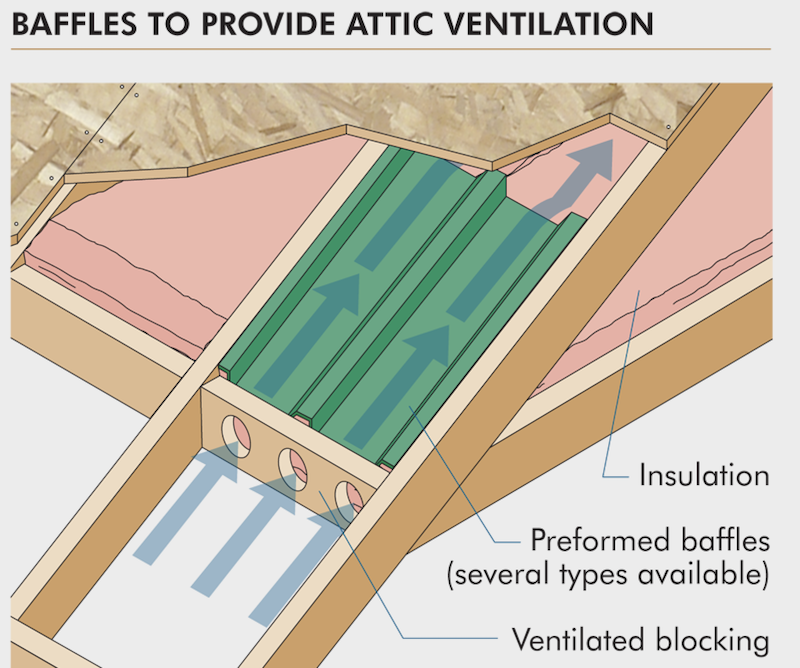
- Install baffles providing a minimum of 1 inch of clear space between framing and/or under roof decking at eaves to ensure that ceiling or roof insulation does not block ventilation paths. For vaulted or cathedral roof construction, provide a free ventilation path from eaves to ridge between all rafters.
Step 3: Fasten Panels Properly
Fasten panels with a minimum of 8d Common (0.131-inch by 2-1/2-inch) nails spaced a maximum of 6 inches on center at supported panel ends and edges. At intermediate supports, fasten panels 12 inches on center. In high-wind areas, more fasteners may be required. Fasteners should be 3/8 inch from panel ends and 3/8 inch from panel edges (see hints below).
For pitched roofs, wear skid-resistant shoes.
On panels with a screened surface or skid-resistant coating, install panels with the non-skid surface up.
Roof panel fastening hints:
1. Position panel. Use temporary fasteners at corners if needed to square panel on framing.
2. Install fasteners at one panel end.
3. Remove temporary fasteners at corners.
4. Install intermediate fasteners, starting at panel edge. Use a chalk line or straight edge to align fasteners on framing. Fasten panels in rows across the width, continuing this sequence along the length of the panel. This procedure keeps internal stress from accumulating in panels.
5. Stand on the panel over the framing near the fastener location to ensure contact with framing while driving fasteners. Fasteners should be driven flush with the panel surface. Avoid standing between framing, which can induce panel deflection.
6. Roof sheathing thickness: For improved performance, consider thicker panels. Also consider panel edge clips, or panels with tongue-and-groove edges.
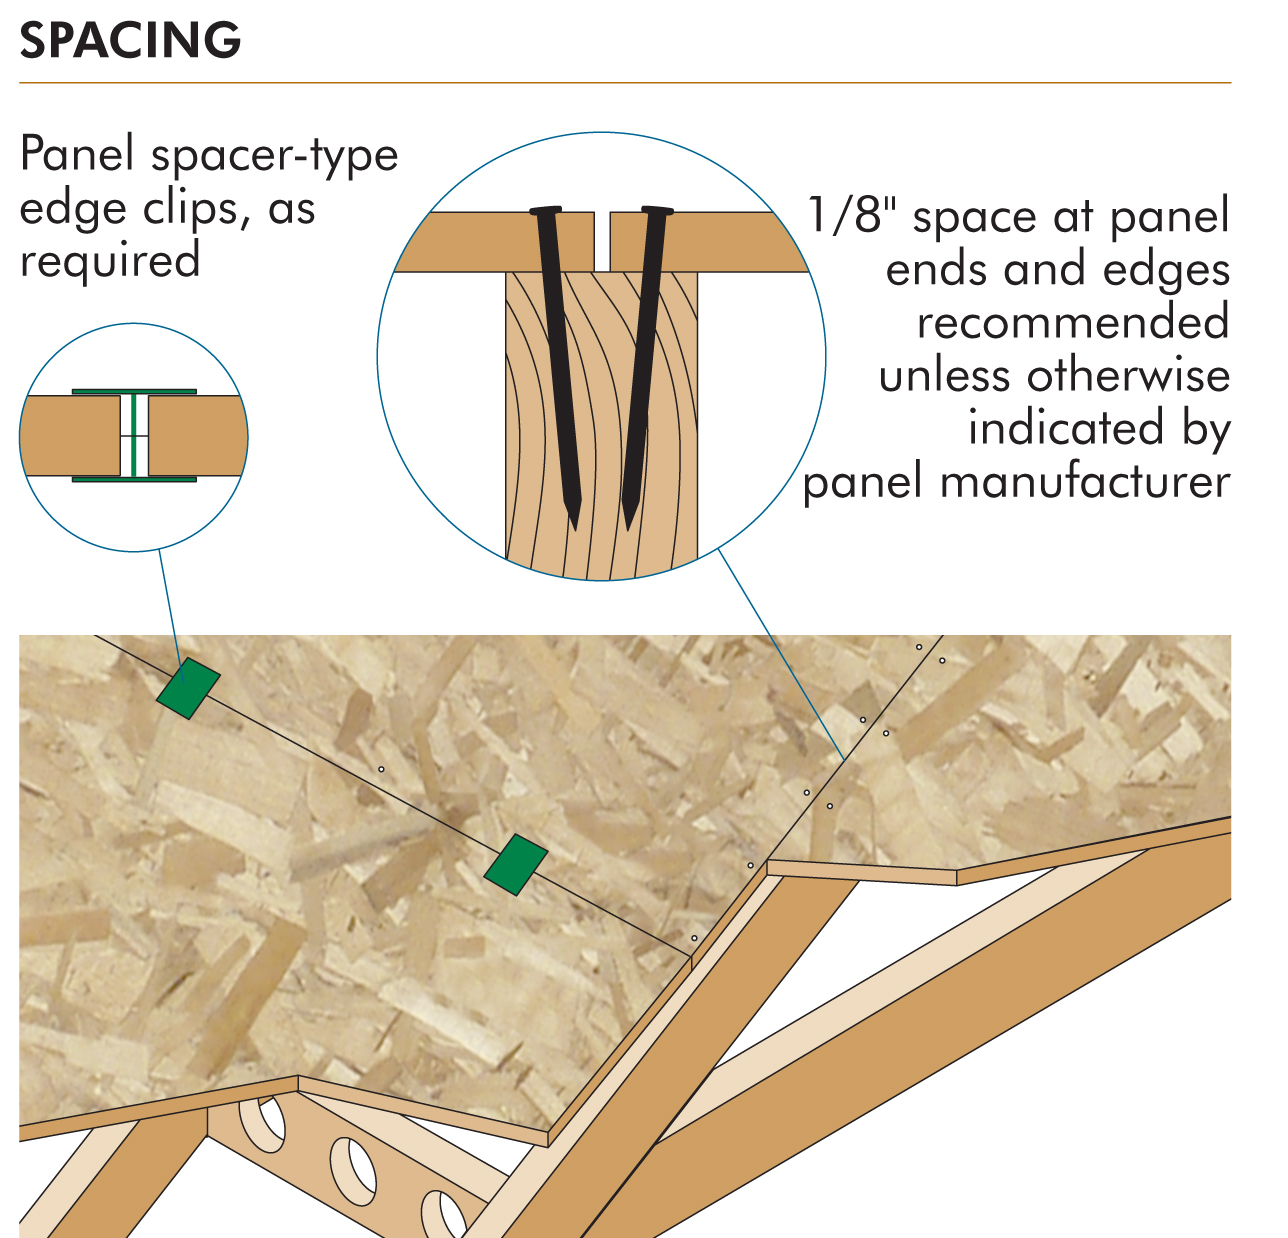
7. A 1/8-inch space between adjacent panel end and edge joints is recommended, unless the panel manufacturer indicates otherwise. Check building code requirements for installation of panel edge clips. Edge clip requirements depend on the relationship of the panel Span Rating to the actual distance between roof framing.
Roof panel spacing hints:
Use a 10d box (0.128-inch-by-3-inch) nail as a spacer to gauge 1/8-inch edge and end spacing between panels. Spacer-type panel edge clips are available from some manufacturers. If necessary, trim panel ends to center on framing.
RELATED
Step 4: Cover Roof Sheathing With Shingle Underlayment Felt
Unless otherwise recommended by the sheathing manufacturer, cover the sheathing with shingle underlayment felt to minimize exposure to weather.
Use shingle underlayment felt conforming to ASTM D226 Type I, ASTM D4869 Type I, or ASTM D6757 (self-adhering polymer modified bitumen sheet underlayment should conform to ASTM D1970) or check roofing manufacturer's recommendations if delays are anticipated during construction. Remove wrinkles and flatten the surface of the shingle underlayment before installing asphalt or fiberglass shingles.
Step 5: Install Roof Shingles According to Manufacturer Recommendations
Roof shingle installation hints:
- If using asphalt or fiberglass shingles, postpone shingle installation as long as possible. This will provide time for roof decking to adjust to humidity and moisture conditions.
- For best appearance, use heavier weight shingles, or laminated or textured shingles. This will mask surface imperfections and reduce the risk of shingle ridging.
This how-to article is part of the Builder Tips series of publications from APA - The Engineered Wood Association. View more helpful strategies, here.
Advertisement
Related Stories

Quality Matters
5 Ways to Silence Squeaky Floors
Take these tips to heart to deliver quiet floors and satisfied homeowners
 within the thermal enclosure may seem like too much work, but you'll find the benefits far outweigh the effort required to do it. | Image: courtesy IBACOS")
Quality Matters
Tips for Placing HVAC Ducts in Conditioned Space
See how putting HVAC ducts inside conditioned space in a home benefits both the builder and the homeowner

Quality Matters
Don't Underestimate the Importance of Roofing Underlayment
Regardless of which product you choose to use, installing a roofing underlayment will help ensure the roof system withstands the elements and the home stays dry

