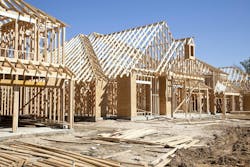
4 Framing Tips for Durability and Performance
Key Takeaways
- Old-school framing methods do not jive with today's energy and cost efficiencies
- Optimum-value engineered framing creates more room for insulation, saving costs and energy
- Consider how wood moves during seasonal climate differences to reduce drywall cracks
One of the most memorable quotes that I recall from my time as a framer in the 1970s is “When in doubt, add a stud!” The rationale was that more wood is better, stronger, and more likely to pass building inspection (as minimal as those were in that era!).
But as a student of building performance over the last 30 years, I’ve learned the error in this thinking.
Tip 1: Less Wood, More Connectors
Of course, it’s necessary to have sufficient framing to meet the structural requirements of a given location, especially when we take into consideration naturally occurring events such as tornados, hurricanes, and earthquakes.
However, over the years of studying damage from these events, engineers have learned that connectors and fasteners are just as—if not more—critical to holding structures together than simply using more studs.
Better, it now appears, to effectively secure studs to the top and sill plates with specially designed connectors and the correct type and number of fasteners (and effectively secure sill plates to the foundation) to deliver enhanced structural integrity.
Tip 2: Make the Connection
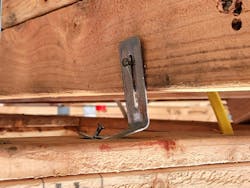
Thankfully, there are products for nearly every conceivable framing connection. But having inspected thousands of homes across the country, I can tell you that these connectors are often not installed properly (see image above).
It’s not uncommon to see a framer put a connector in the right location but use any random type of fastener, as all fasteners are not created equal. Some are designed for superior resistance to pull out (read: ring-shank nails) while others are designed for superior shear resistance (typically those with a thicker shank and head).
Fortunately, manufacturers of framing components don’t leave this decision up to the framing crew by calling out the specific type of fastener for each type of hardware in their installation guidebooks.
Tip 3: Framing for Insulation
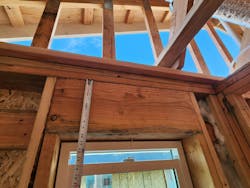
Another excessive framing practice common in the 1970’s was to not worry about header sizes as long as you used double 2x12 Douglas Fir framing over every opening (see image above).
Even today, we see this uniform header strategy used; in fact, I’ve seen many homes with the same size header used for a 6-foot-wide opening under the roof as for a 24-inch-wide window in a gable end wall, which have very different minimal loads to bear.
With so much unnecessary framing, exterior walls end up with a very high wood-to-insulation ratio, which is not optimal for today’s energy efficiency standards, codes, and expectations.
Framing lumber has a nominal thermal rating of about 1-R per inch. The average exterior wall using conventional framing techniques is comprised of about 35% solid wood when you consider the 16-inch stud spacing, top and bottom plates, cripples, etc.
Add to this the exterior sheathing and the framing on a 2x4 wall that is rated at about R-4, and if the stud cavities on that 2x4 wall are filled with R-13 batts, the overall thermal performance of the wall is about R-7, far lower than today’s best practices and code requirements.
(Another factor to consider is the cost difference between lumber and fiberglass insulation. Hint: Insulation is a lot less expensive and far more thermally effective.)
A process commonly known as Optimized Value Engineering (OVE) reduces the unnecessary framing that goes into a wall (often adding connectors to supplement), reducing the amount of lumber and replacing it with insulation.
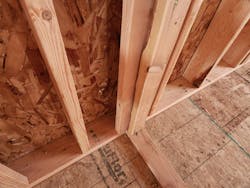
A common and effective example is the “California corner,” also refered to as an "energy" corner (see image below). This is a method of framing a corner allows insulation to be placed further into the corner rather than having solid wood or worse, blocking and air gaps.
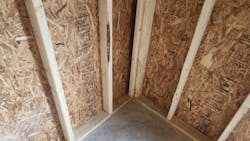
A similar method is used on exterior partition tees that allows insulation to be placed through the back of the partition connection (see image below).
Tip 4: More Reasons to Reduce Wood
Another overlooked consideration is that lumber expands and contracts according to its moisture content. More moisture, more swelling.
Now consider that wood swells more across the grain than in the length of the grain. At every corner of an opening where you have lumber laying horizontally (think: headers), in connection lumber standing vertically (as in trim and king studs), the expansion and contraction of the wood in these connection points according to the climatic conditions puts stress on the drywall that bridges between the two—a dynamic that often contributes to drywall cracks in the corners of window and door openings.
To help mitigate this condition, minimize the lumber to only what is required for structural support in such locations. It also helps to avoid putting drywall joints within 6-inches of the corners.
Bottom line: Reducing unnecessary framing can go a long way toward improving a home’s thermal performance. When structural loads are a concern, properly installing the right connectors is what really counts, not just adding more lumber.
And swapping out expensive lumber for affordable insulation not only saves money during construction, it also offers homebuyers a better, more energy-efficient home at a reduced cost.
About the Author

Graham Davis
Senior Building Performance Specialist
Graham Davis drives quality and innovation in home building as a senior building performance coach at IBACOS.