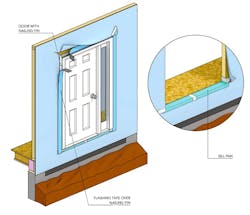
Manufacturers have worked hard to encourage proper door flashing, with more installer instruction, better peel-and-stick products, and flanged brickmold doors that are flashed like windows. These days, the best door installers obsess over flashing details. Even so, we still see lots of poor detailing. Even if the result is just a minor leak, today’s high-performance wall systems have less drying potential. This means that small leaks can lead to big problems.
Good detailing isn’t complicated if you keep some basic principles in mind and pay attention to the problem spots: improper integration of flashing with the drainage plane, doors without sill pans, and missing drip caps over the door.
Incorporating a flange or nailing fin on entry and patio doors is becoming more common—for good reason. The flange allows doors to be flashed and integrated with the drainage plane in the same way a flanged window is integrated. But improper sequencing of peel-and-stick flashing is shockingly common, with upside-down laps that rely on the adhesive for long-term waterproofing, a job it’s not made for. Flashing, like siding and roofing, must be lapped in order to shed water.
Prepping the substrate and rolling the tape into place ensures it will stay put over time. Good long-term adhesion requires that the substrate (the weather resistive barrier) be clean and dry, and that the tape be firmly seated during installation. Smoothing the tape into place by hand doesn’t create enough seating pressure; it needs to be pressed into place with a rubber J-roller. And water will eventually get past the cladding, at which point the flashing will be called on to keep it out of the structure.
Both sill pans and drip caps are crucial for preventing water infiltration. Sill pans were traditionally fabricated from metal, but today there are easier, less expensive options. One is to fabricate the pan from a length of stretchable flashing: Lay the flashing over a piece of bevel siding nailed to the base of the opening to create a drainage slope, and stretch the flashing tape around the corners at the base of the opening. Another option is a three-piece plastic pan. These products include corner pieces with wings that wrap around the sides and bottom of the opening. Be sure to seal the overlaps between the pieces with the manufacturer’s recommended adhesive— generic silicone will leak over time. Drip caps are cheap insurance, especially in areas that get wind-driven rain. Many advise installing them on any exterior door unprotected by an overhang, but they should really be used on all exterior doors.
Image: IBACOS
Even builders who train their crews on proper flashing techniques may encounter problems if they subcontract the door installation to the wrong crew; be sure to use crews that have been trained and certified by the particular door manufacturer. When installing a door with a flange or nailing fin, check for the following key details:
Cut the WRB. I-cut the weather resistive barrier at the opening. Fold the sides into the opening and staple them in place. Make diagonal cuts in the WRB at the top of the opening on each side. Fold the flap up and tape it into place.
Install the sill pan. If it’s a three-piece rigid pan, lay it over three beads of construction adhesive and seal laps between the pieces with the manufacturer’s recommended sealant.
Hang the door. Install the nailing flanges against the WRB and back-caulk with a quality ASTM C920-compliant sealant. Check that the door is square in the opening. Fasten in place.
Apply the tape. Apply flashing tape to the vertical flanges first, extending the tape about 2 inches past the top and bottom of the opening. Install the drip cap at the top of the door and seal the top edge with flashing tape, extending the tape on both sides. Roll the tape firmly into place with a rubber roller. Then fold the WRB flap back down and put tape over the diagonal cuts.
This piece originally ran as part of IBACOS's Quality Matters series.
Richard Baker is program manager of the Builder Solutions Team at IBACOS

