6 Best Practices for Flat Roof Assemblies

Flat or low-slope roofs—often a staple of contemporary and modern residential architecture, especially in desert or arid regions—have become increasingly popular. Part of the appeal of flat and low-slope roofs lies in their aesthetics, cost-effectiveness, and potential to provide additional usable space, such as rooftop patios or gardens.
And this roof type does offer unique advantages—under the right circumstances. However, proper design and installation are crucial to ensuring that rainwater and ice/snowmelt drains efficiently and effectively to maintain peak performance over time. Because flat and low-slope roofs are prone to water collection and weather-related issues, such as leaks and drainage problems, these roofs are often found in regions where rainfall and snow are minimal, such as the Southwest region of the U.S.
What Are the Types of Flat Roof Assemblies?
For years, the most common flat roof assemblies relied on modified bitumen, ethylene propylene diene monomer (EPDM), and “Build up Roof” (BuR), the latter fabricated by layering roofing felt with hot, liquid asphalt, followed by additional layers of asphalt and gravel for durability and ultraviolet (UV) protection from the sun.
RELATED
- Don't Underestimate the Importance of Roofing Underlayment
- How ‘Cool Roofs’ Can Reduce Heat in Cities
- Quick Tips for Safe Roofing
However, the main issue with BuR systems was their vulnerability to deterioration and water intrusion. When leaks occurred, it was often difficult to locate the source, as water would travel laterally through the layers, often appearing in the living space far from its original point of entry on the roof surface.
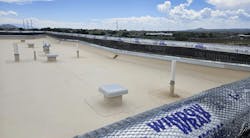
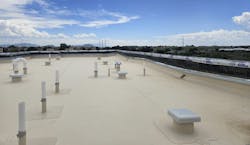
Today, the most common flat roof systems use a single-ply membrane, with EPDM, polyvinyl chloride (PVC), and thermoplastic polyolefin (TPO) being the most popular single-ply choices. Unlike the layered systems of the past, single-ply membranes offer more reliable performance and easier installation.
Today, the most common flat roof systems use a single-ply membrane, with ethylene propylene diene monomer (EPDM), polyvinyl chloride (PVC), and thermoplastic polyolefin (TPO) being the most popular single-ply choices.
As a heat-weldable single-ply roofing membrane that can be either mechanically attached or fully adhered, TPO is favored because seams can be fused together using heat, creating a watertight, seamless bond. In addition, the material’s white surface reduces solar heat absorption, aiding energy efficiency by reducing the need for air conditioning.
6 Best Practices for Single-Ply Roofing
1. Ensure the roof is properly sloped
Before installing a roofing membrane on a flat roof, it’s crucial to make sure that the roof structure isn’t truly “flat.” A flat roof still needs to have a slight pitch to effectively shed water to a drainage system, such as a gutter or a scupper that passes through a parapet wall.
Specifically, the roof should be designed with a minimum pitch of at least 2% (or ¼-inch slope per foot) and “crickets”—a peak that diverts water—in the corners to keep water from pooling in those areas.
2. Seal the seams
With single-ply roofing membranes, the seams are the most critical area for achieving a waterproof roof system. It’s essential to follow the manufacturer’s installation guidelines closely to make sure seams are sealed properly and the membrane performs as intended.
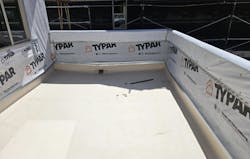
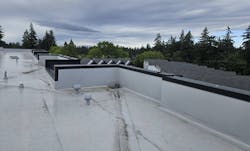
3. Flash parapet walls
Pay special attention when working with parapet walls, which are commonly found in residential designs, such as adobe-style homes.
Consider the following best practices to address the roof-to-wall junction:
- Wrap the roofing membrane over the parapet wall and lap it over the exterior drainage plane, and finish the parapet cap with cladding (such as stucco) or a metal cap.
- Cap the parapet with an independent waterproof membrane that covers both sides of the wall and overlaps the roofing membrane on the roof side.
- Seal the membrane to the interior side of the parapet wall, especially when using concrete masonry unit blocks, which is a more common practice in nonresidential applications.
4. Seal boot penetrations
Penetrations through the membrane, such as vents or pipes, should be sealed with roof or pipe boots that are compatible with the membrane and are custom fitted to the size and type of penetration. As with the seams, proper sealing of the boot and surrounding membrane is essential for maintaining the roof’s integrity.
5. Connect the drainage system
When directing water to a scupper, drainpipe, or downspout, it’s important to seal the membrane thoroughly to the drainage system according to the manufacturer’s instructions.
6. Lap the open edges
If water is directed over an open edge at the bottom of the slope, the membrane should lap over a drip edge to ensure water is diverted away from the exterior walls. Installing a gutter is recommended to carry water away through a downspout, preventing it from reaching the building’s foundation.
Flat roofs can be an excellent choice in the right climate, offering both functional and aesthetic benefits. With the right materials, proper installation, and regular maintenance, a flat roof can provide long-lasting performance for homes.
About the Author

Graham Davis
Senior Building Performance Specialist
Graham Davis drives quality and innovation in home building as a senior building performance coach at IBACOS.

Clem Newcamp
Clem Newcamp is a dedicated professional serving as the manager of field services and client success at IBACOS, in Pittsburgh.