The Ins, Outs, and Arounds of Proper Crickets and Saddles
Crickets and saddles can make or break a roof’s long-term performance, but these subtle features are often overlooked during design or improperly executed during construction, leading to water intrusion, wood rot, and premature roof failure.
For home builders focused on delivering quality and avoiding callbacks, understanding crickets and saddles and paying attention to the details of their design and construction is absolutely essential.
What Are Crickets and Saddles?
Crickets are ridge-shaped structures designed to divert water around roof penetrations or obstructions, such as chimneys, valleys, skylights, HVAC units, and other roof structures.
While the terms are often used interchangeably, there's a subtle difference: The National Roofing Contractors Association (NRCA) Roofing Manual states: “A cricket is basically two sloping planes joined at a ridge (while) a saddle is … two crickets put back to back, or a pyramid-looking structure.”
Both are typically framed into the roof structure and can be finished with the same material as the surrounding area, be it shingles, metal, or a roofing membrane. Their job is simple but crucial: top prevent water from pooling or damming, which can lead to leaks and latent (and very costly) structural damage, mitigation, and replacement.
Why They Matter
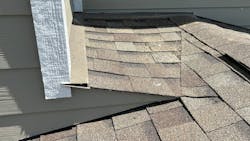
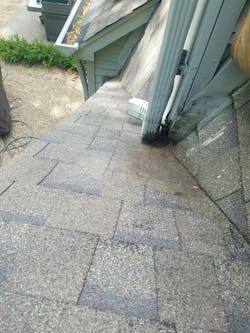
One of the most common causes of roof leaks is water backing up behind a chimney. Without a cricket, rainwater and snowmelt runoff hits the uphill side of the chimney and settles there, seeping into the flashing, and eventually making its way into the attic space or living areas.
For builders, improperly installed or missing crickets often result in costly warranty work, insurance claims, and a hit to their reputation.
Similarly, improperly constructed saddles may appear correct to the eye but ultimately fail in heavy rain or snowmelt conditions.
Framing the Structure
The first step in proper execution is accurate framing. Crickets and saddles should be framed with slope that is sufficient to divert water—ideally, at least 1.5 times the slope of the adjacent roof. For example, on a 4:12 slope roof, the cricket should be framed at no less than 6:12 to ensure effective drainage.
- Chimney Crickets: Building codes such as IRC R903.2.2 require crickets behind any chimney or penetration wider than 30 inches. The cricket should be framed symmetrically and centered behind the chimney.
- Wide Saddles: For wide saddles between roof drains or parapets, use tapered insulation or built-up framing to create an adequate slope, ensuring water does not pond behind obstructions
Sheathing and Underlayment
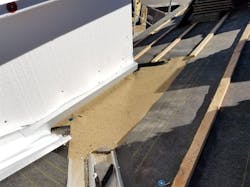
Once framed, the cricket or saddle can be sheathed with the same material as the surrounding roof (typically plywood or OSB), followed by an ice and water shield.
The best practice recommendation is to cover the cricket or saddle with metal, the type and thickness consistent with the anticipated service life of the entire roof system.
For low-slope systems, use compatible membranes and extend base flashing onto the cricket. Best practices include:
- Overlap: Ensure underlayment from the main roof overlaps onto the cricket or saddle. Cover with ice and water shield and maintain a consistent vertical lapping pattern to direct water downslope.
- Fastening: Avoid driving fasteners on the cricket peak or in the valleys, which can compromise waterproofing.
Flashing Integration
Flashing is where most crickets fail. Proper integration with roof flashing is non-negotiable, so integrate and enforce the following quality standards:
- Flashing should extend up the wall and be integrated into the drainage plane.
- Step Flashing (Shingle Roofs) should be used along both sides of the cricket, interwoven with each course of shingles.
- Counterflashing (Chimneys) should be applied to the upturned cricket membrane into the chimney mortar joint or reglet cut.
- Metal Roofs require pre-fabricated cricket panels with sealed seams to ensure compatibility with standing seam or corrugated profiles.
Finishing and Inspection
Final roofing materials must transition smoothly over the cricket or saddle without breaks or reverse laps. Always inspect for:
- Proper size and slope ensuring proper water run-off direction.
- Full coverage of underlayment and absence of fastener penetrations near critical joints.
- Secure, compatible sealed flashing at all transitions.
- Full coverage and watertight installation of the finish roof cladding.
Properly constructed crickets and saddles are essential for long-term roof performance. For home builders, ensuring the suggested best-practice features, materials, and applications are included in the design, framed, waterproofed, and integrated into the roofing system is essential.
Attention to these technical details prevents future failures and reflects a commitment to quality that clients will notice.
About the Author

Roy Fanara
Roy Fanara drives quality and innovation in homebuilding as a building performance coach at IBACOS.

Clem Newcamp
Clem Newcamp is a dedicated professional serving as the manager of field services and client success at IBACOS, in Pittsburgh.