Building Envelope Solutions for Moisture Management
An irony of high-performance home construction is that the newer materials that help builders construct a better-insulated envelope also have the potential to create new moisture problems. Tighter building enclosures don’t dry out as easily as older, inefficient structures do.
Advanced Products Bring New Challenges
Innovative labor-saving sheet products, such as gypsum board and OSB sheathing, have increased our ability to construct tighter buildings. But new materials that reduce air infiltration, such as housewraps and high-density insulation, have also contributed to the reduced drying potential of building assemblies. Even new homes constructed to minimum building energy codes are tighter and less forgiving of moisture intrusion than older homes.
The dramatic increase in the use of central air conditioning throughout the year, even in colder climates, has resulted in colder surfaces on inside wall cavities creating ideal conditions for condensation and mold growth. The latest building energy codes (that is, IECC 2009, 2012, and 2015) demand increased airtightness and insulation.
When properly designed and installed, these new materials are cost-effective and improve comfort and energy efficiency. But modern building assemblies are also less tolerant of design and installation flaws. To control the flow of air, heat, and especially moisture in and out of buildings, today’s homes must be better designed and built.
Installing Housewrap Correctly Is Crucial
Proper installation of housewrap or building paper will improve performance, help manage moisture, reduce mold potential, and increase a building’s durability.
Installation is typically done by the same trades that install the exterior cladding. In most parts of the U.S., the drainage plane materials are installed over exterior walls before the windows get installed. However, in some parts of the western U.S. (predominantly where stucco homes are common) the drainage plane may be installed after the windows have been installed.
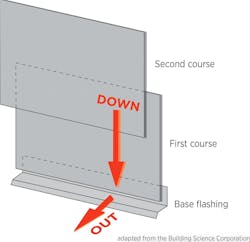
Figure 1. Install housewrap or building paper in shingle fashion so moisture drains out, away from the wall. Illustration: Building Science Corp.
Before installing any drainage plane material, obtain full and detailed guidelines from the manufacturer, including information on integrating these practices with other building-envelope systems. Some housewraps, for instance, can interact with the additives in some stuccos.
Installation practices for housewrap and building paper are roughly the same. The main differences are that more courses are usually required for building paper, due to smaller roll widths. In addition, different sealants are required to bond flashing materials and to seal penetrations. Note that building papers and housewraps have different properties and can interact with cladding materials differently. Some housewraps, for example, are adversely affected by additives in hard-coat stucco; here, using two layers of Type D coated building paper or paper-backed stucco lath over wrinkle wrap instead are alternatives.
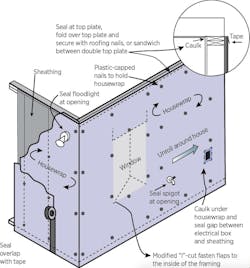
Figure 2. For a continuous drainage plane, use caulk, tape, and gaskets to seal around all holes
and seams in the housewrap. Illustration: Building Science Corp.
Follow these general guidelines for installing most common housewraps and building paper.
1. Start at the bottom of exterior walls and work your way up, installing each subsequent course so it overlaps the course below, as shown in Figure 1 (above). This is critical for ensuring that water flows down and out, away from the building.
2. Unroll housewrap or building paper horizontally. Begin at a building corner, leaving a 6- to 16-inch overlap to wrap around the corner. The amount of overlap will vary according to the manufacturer’s recommendations. The first course should overlap the flashing at the base of the walls. Also, be sure to overlap the vertical leg of any deck flashing, roof-wall flashing, or other flashing, using a consistent “shingle-style” lapping method. This will require installing flashing before installing the drainage plane to avoid “reverse shingling.”
Figure 3 shows multiple layers of water protection installed at a vulnerable roof-to-wall juncture. These layers include self-adhesive roof membrane, housewrap, metal flashing, shingles over the roof, and more housewrap over the metal flashing.
3. Roll out the material over window and door openings, and come back afterward to integrate it with window and door flashing.
4. Stagger the ends of each course so that seams between courses don’t align; overlap all seams, following manufacturer recommendations. Typical: a 4-to-6-inch overlap for vertical seams and a 2-inch overlap for horizontal seams.
5. Secure housewrap or building paper to the wall sheathing or framing members using wide-crown staples or nails with a large head. For wood-frame construction, cap nails that have a large plastic washer are recommended. Space fasteners following manufacturer guidelines; every 12 to 18 inches is typical. Best practice in wood-frame construction calls for nails with a large plastic washer to secure housewrap and building paper to the exterior of walls as in Figure 2.
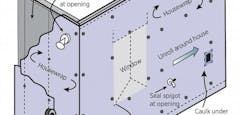
6. Seal around penetrations (such as light fixtures, water spigots, exhaust vents, and piping for mechanicals) with tape, caulk, sealant, or plastic gaskets as shown in Figures 2 and 4. Follow the product manufacturer’s recommendations when selecting caulks and sealants to be sure that they’re compatible with drainage plane materials.
7. Tape all horizontal and vertical seams for housewrap materials that will serve as an air barrier. In addition, caulk under the top edge at the top wall plate and the bottom edge that overlaps the base flashing (Figure 2). Be sure to use a sealant that’s formulated to adhere to the flashing material and is compatible with the housewrap.
8. Install the cladding system as soon as possible after housewrap or building paper is in place. Any housewrap or building paper will tear, and holes created by the fasteners will elongate if exposed to repetitive wind loading for extended periods. If tears do occur, as shown in Figure 4, repair with housewrap tape. In addition, ultraviolet (UV) light from the sun breaks down housewraps and building paper. Building paper is especially vulnerable to UV degradation. Some housewraps are more UV-resistant than others, but all have limitations on how long they can be left exposed to sunlight.
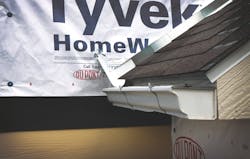
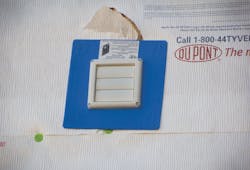
Figure 3 (above). Flashing keeps water out of the wall at the roof juncture. Photo: DryFlekt
Figure 4 (below). Torn housewrap admits water; untaped seams are leaks in the air barrier. Photo: Pacific Northwest National Lab