Getting Brick Ties Right
Brick veneer has a lot going for it. This wall cladding offers low maintenance as well as rich and historically appealing aesthetics, making it a smart choice to use. Except when brick cladding is done incorrectly.
While veneer failures are unusual, the underlying causes aren’t, especially when it comes to ties. In fact, my colleagues and I at IBACOS see recurring issues with brick ties, especially when installed by workers new to the trade. These mistakes may not cause immediate problems, but, under the right circumstances, they can present the builder with a huge liability.
RELATED
Avoid These 4 Pitfalls When Installing Brick Ties
Here are the most common issues we’re seeing, along with best practices for doing the job right when installing brick veneer.
1. Inaccurate spacing of brick ties
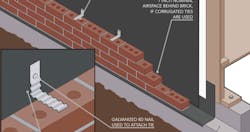
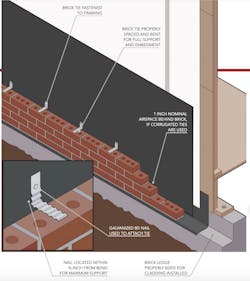
While trades all too often place ties where they find them to be convenient, resulting in attachment only to plywood or OSB sheathing, they should really be nailed to framing. Most codes specify one tie per 2.67 square feet of wall area, which can be met by nailing ties to each stud and spacing them every 16 inches up the wall. The numbers work with 16- or 24-inch stud spacing.
2. Poor nailing practices
In some communities, we’ve seen corrugated ties installed with uncoated nails, which are susceptible to corrosion. In others we’ve seen installers use roofing nails, which don’t penetrate the framing deeply enough. Always use a minimum 8d (21/2-inch) galvanized nail. If you’re using corrugated ties, nail as close as possible to the bend for maximum lateral strength.
3. Brick ties installed upside down
Some installers fasten all the ties to the wall before starting the brick. On these jobs, we often see corrugated ties folded so that the horizontal leg—the one embedded in the mortar joint—is above the vertical leg nailed to the wall. Presumably, the ties lined up that way up when the bricklayers reached them. One problem is that an upside-down tie will act as a spring under load. Another danger is that water dripping down the wall can seep behind the tie and start corrosion or allow for water to enter the wall.
Traditionally, bricklayers installed ties as they moved up the wall, which ensured a proper bend. If that’s not acceptable, consider using base and vee ties, which consist of a base with a slot that is attached to the wall and a wire vee that extends from the slot to the mortar joint. Since the slot provides up to 4 inches of vertical adjustment, the installer can align the vee with any joint height.
4. Wide gaps
Corrugated ties are only stiff enough for a 1-inch airspace. In some areas, however, foundation contractors routinely make ledgers wide enough for stone veneer. Then when brick is used, the bricklayers align it with the outside of the ledger, leaving a 2- to 2 1/2-inch space. Even if the wall doesn’t fail, the brick courses can deform under a wind load, causing cracks to develop in the veneer.
There are ways to avoid this. You can specify the right-size ledger, or you can hold the brick back from the edge. Another option is to use a commercial type of tie, like a base and vee tie, which is rated to span 3 inches or more.
Tim Kampert is a building performance specialist on the PERFORM Builder Solutions team at IBACOS.