One-Coat Stucco Basics—6 Common Problem Areas
A traditional three-coat stucco system includes a water-resistive barrier (WRB), an independent bond break layer, wire lath, a scratch coat, a brown coat, and a finish topcoat. It’s a proven and durable system, but it can be expensive and time-consuming, requiring a longer cumulative curing time. By contrast, one-coat stucco has the potential to save time and money for builders, and it offers additional R-value when rigid foam panel insulation is used as the bond break layer. Unfortunately, we’re seeing recurring mistakes with one-coat systems that could lead to latent defect issues.
“One-coat” stucco actually uses two stucco coats in most applications. (Early formulations used a single coat, but the color and texture were inconsistent.) As with any exterior cladding, it should always be installed over a properly executed WRB. Proper execution and attention to detail are a must. Pay attention to these six potential (and common) problem areas:
1. Sealing penetrations at the WRB:
As with any cladding, all penetrations in the building envelope (doors, windows, plumbing, mechanical, and electrical penetrations) must be properly sealed at the WRB. Often in a one-coat stucco system—especially in open framing conditions—I only see penetrations sealed at the outer surface of the foam bond break prior to lath installation. To avoid leaks, you must seal all penetrations at the WRB.
2. Improperly fastened lath:
It’s common to see staples securing the lath not driven into framing, or staples that hit the studs but are set too deep into the foam bond break. The problem with missing the framing is that the lath will eventually pull away from the wall. Over-fastening is just as bad: every additional staple is an unnecessary penetration in the WRB. Space staples every 7 inches at stud locations, their heads flush with the surface of the rigid foam panel to firmly hold the lath while leaving enough give for the stucco to make a bond.
RELATED
3. Mixing problems:
If there’s litigation over cracked stucco, an investigator may perform “destructive testing” by taking a sample of stucco cladding and examining it under a microscope to determine if the mix is the correct ratio of Portland cement to sand and that the stucco is free of contaminants such as elements found in native soil from the site. Both weaken the mix.
To get the correct ratio, consider a bagged mix that incorporates sand and cementitious elements in proper proportions—only requiring the addition of water. If mixing the sand and cement on site, consider delivering the sand on a sheet of clean polyethylene to keep any dirt out of the pile.
4. Insufficient hydration:
We recommend that the stucco’s pH level be 9 or lower for paint to properly adhere. (The painter should test for this.) The only way to get it that low is to hydrate the stucco surfaces so they don’t dry too fast. Some stucco contractors only wet the surface once, but in a hot, dry climate, three independent cycles of hydration are recommended. Make sure the contractor documents this hydration schedule. Some builders place a sticker on a window where the contractor can sign off on each hydration.
5. Dissimilar material transitions:
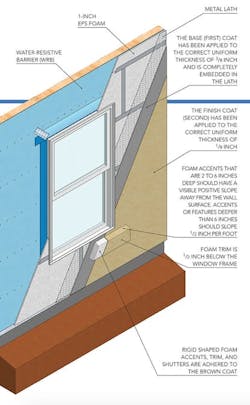
Wherever two dissimilar materials meet, leave the recommended gap, then fill it with backer rod and sealant to keep differential expansion rates from cracking the thin stucco layer.
6. Accessories and foam accents:
Select accessories best suited for local climate and environmental conditions that have perforated or expanded flanges shaped to permit complete embedment in the stucco. Glue foam accents such as cornice and window trim to the brown coat after it dries. I’ve seen them placed directly on the foam and nailed in place, but this creates unnecessary penetrations in the drainage plane.
STUCCO BASICS
- Stucco cement classification verified to be Type N, S, or M adequately protected from weather and risk of damage.
- Stucco sand-to-cement ratio is measured according to manufacturer specifications using buckets or equivalent measuring implements for accuracy.
- To achieve a more reliable bond between the first and second coats and to reduce rapid water loss, the second coat should be applied when the first coat is rigid enough to accept the second layer.
- Moist curing (hydration) per the guidelines set forth in ASTM C926-11a section X1.4.2.5.
- Hydration should be performed during curing and prior to application of the finish coat until the pH level is at or below 9.
John F. Koenig is a building performance specialist with the PERFORM Builder Solutions team at IBACOS.