Gaps Are Good: Leave Strategic Gaps in Construction to Limit Cracks and Callbacks
The previous edition of this column addressed drywall cracks caused by movement of a home’s framing members due to changes in temperature and humidity, as well as wind, seismic, and live loads.
In fact, almost every aspect of a house is constantly in motion. If neglected in your construction processes, this dynamic can (and usually does) lead to callbacks with varying degrees of severity, especially early in a home’s life.
It’s a bit of an art to accommodate the near-constant settling, swaying, shrinking, and expansion of a home’s structure and finishes. If I had to sum up the solution in three words, it would be: “Leave gaps everywhere.” It’s that simple. And, in most cases, fill those gaps with a high-quality, flexible sealant.
RELATED
- Do This to Ensure Fiber-Cement Siding Is Trouble-Free
- Mitigate Cracks and Warranty Calls With Correct Construction Detailing for Siding
- Tips for Avoiding Cracks in Post-Tensioned Concrete Slab Foundations
How to Avoid Cracks in the Roof, Walls, and Floors
Concrete slabs
The most common cracks in concrete slabs are due to shrinkage early in the curing process. A control joint—a surface cut or groove at least one-quarter the depth of the slab—can direct where a crack occurs, help keep it straight, and conceal it to some extent.
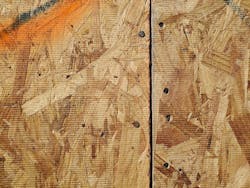
Sheathing
For the roof, walls, and floors, APA (The Engineered Wood Association) recommends a 1/8-inch gap on all sides of a panel to allow for expansion and contraction caused by moisture. Without such gaps, you can expect issues with finish materials.
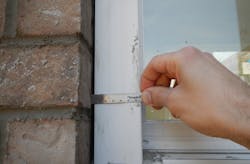
Siding
For wood, fiber-composite, or cementitious siding types, follow manufacturer instructions for gapping. All siding requires edge gaps where siding meets trim pieces, as well as over drip caps, water tables, and hardscape and landscape elements. Lap siding extends lengthwise as it warms from the sun; a gap allows this movement to occur without causing issues, such as buckling.
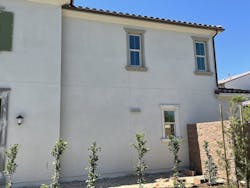
Brick veneer
Long wall sections require expansion joints, but there also should be a ¼-inch gap around windows, door frames, and at material transitions. Butting brick up tight to a vinyl window is a recipe for a cracked frame or thermal unit, or for the window to stick.
RELATED
- Framing Best Practices That Help Prevent Drywall Cracks
- Do Concrete Slabs Really Need Welded Wire Mesh?
- Conquering Drywall Cracks
Stucco Control Joints to Prevent Cracks
Like concrete floors, three-coat stucco requires control joints to control cracks. Best practices for these gaps are outlined in ASTM Standards C926 and C1063.
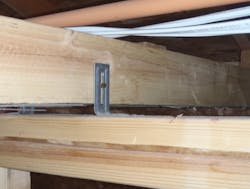
Drywall Cracks and Truss Uplift
In addition to managing truss uplift (see below), other places where gaps allow frames to move without cracking drywall include a 6-inch gap between the corners of rough openings and any vertical or horizontal joints in the drywall.
Tile floors
Ceramic tile should be decoupled from structural substrates. Create gaps between the tile and subfloor and fill them with crack-isolation membrane.
Tiled shower walls
We’ve covered best practices for waterproofing tiled shower walls in previous articles, but gaps are essential where tile meets other materials, such as a fiberglass tub or shower pan, and also where it turns a corner. Grout lacks flexibility, so fill those gaps with sealant to reduce cracking.
Material transitions
All transitions from one type of material to another along a finish surface, inside or outside, need a 1/8-inch gap filled with sealant.
About sealant:
Rule No. 1: Don’t skimp on sealant! Also, sealants must be durable and flexible. We recommend brands that meet ASTM C920 Class 25 standards. In addition, not all joints are created equal, and sealant simply pressed into a corner will fail early. A best practice is to create an “engineered joint” that fills a gap and bonds only to the two opposing surfaces. For large gaps, press backer rod into the depths of the gap and apply sealant over it, providing the greatest degree of flexibility.
Houses are forever on the move. Let’s build them in a way that allows for it.
Graham Davis drives quality and performance in home building as a senior building performance specialist on the PERFORM Builder Solutions team at IBACOS.