How to Avoid Drywall Problems From Truss Uplift
Drywall cracks are among the most common callbacks in wood-framed construction, but prevention is often a matter of attending to a few simple details.
While some job supervisors may resist adding another item to their already busy schedules, getting your framers on board with these details and verifying the work takes a lot less time and cost than addressing ongoing problems and repairs, which won’t make your homebuyers very happy.
The details to mitigate drywall cracks and nail pops, especially at the wall-ceiling joint, include managing truss uplift, proper fastener placement, and using the right hardware.
Truss Factor: How Moisture and Movement Create Problems
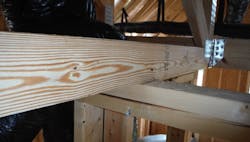
Factory-built roof trusses generally arrive at the job near their maximum allowed moisture content, and drywall usually gets hung before the trusses “dry out” to achieve an equilibrium moisture content with the location.
As the truss dries, the bottom chords can shrink and pull away from the top plate of interior, non-load-bearing walls. The issue magnifies when the top chords are exposed to higher humidity in vented attics, causing expansion of the lumber and creating more dramatic truss uplift (or “arching”).
As the truss arches and pulls away from the wall framing, ceiling drywall fastened too close to the wall/ceiling intersection follows the bottom chord as it rises, pulling that seam apart and creating cracks and nail pops. And, as ambient moisture (aka relative humidity) in and around the home fluctuates through the seasons, the chords can continue to move up and down, causing further or ongoing problems.
How Do You Secure Trusses to the Wall? Fastener Fixes to Address Movement
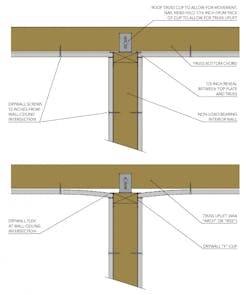
To address this movement, fasten the ceiling drywall to the truss at least 12 inches away from the wall/ceiling intersection, and secure the drywall at that intersection with “F”-type drywall clips. As humidity rises and falls through the year, the drywall will flex rather than crack when the truss chord moves, as shown in the illustration at right.
Of course, the top of the wall needs to be secured against lateral movement, but nailing the truss’s bottom chord to the top plate is a bad idea; as the truss shrinks and rises, it will lift the wall, as well. Instead, use roof truss clips at that connection, which provide support while letting the chord move freely. Leave a 1/16-inch gap between the nail heads in the clip’s vertical leg and the face of the hardware for some flex.
Some builders who use truss clips lay the truss right on the wall plate, but we recommend a ½-inch gap between the top of the wall and the truss. If the truss moves downward, as it will under snow loads or before it is loaded with a roof finish, a truss that’s already tight to the wall will push down on it, stressing the truss chord and the wall. The gap prevents that stress, allowing for incremental, load-driven movement.
Framing Tips for the Wall-Truss Connection
Some builders ask framers to cut wall studs slightly shorter to create that gap, but doing so adds time and complexity to the job. Other builders use a single top plate without adjusting stud height, but that tactic often leaves too much clearance between the wall and the truss chord.
A solution we like calls for a 1x4 as the second top plate. It not only takes far less time than cutting studs, but is more reliable and leaves a proper gap at the wall-truss connection.
Other builders simply hide the problem with crown molding. Even if cracks don’t extend past the molding, it’s a costly “solution” compared with simply doing it right the first time.
The Bottom Line
If you can, let the trusses “dry out” before hanging the drywall, keep ceiling screws away from the wall, use drywall and truss clips to allow flexibility, and leave a gap between the truss chord and the wall, all of which ultimately will save you time, money, and headaches in the long run.
Tim Kampert is a building performance specialist on the PERFORM Builder Solutions team at IBACOS.
- This story originally appeared in the April 2019 issue of Professional Builder magazine. See the print version of this article here.