How to Manage Moisture in Walls: Tips for Designing and Building
This is an extended version of an article that appeared in the March/April 2021 issue of Pro Builder.
Perhaps you have seen for yourself how moisture trapped in a wall assembly can wreak havoc and destroy interior finishes and structural assemblies. Hints of possible trouble could include water-stained drywall, warped boards, or peeling paint on exterior siding. But when you peel back the layers of the wall, those little annoyances reveal water-soaked insulation and rotted, crumbling sheathing and framing members. Thus, the nightmare begins, and what began as a “minor repair” will take far more time and money than anticipated.
A fundamental truth about wall construction is that, at some point, walls will be exposed to moisture, so they must be designed and built in a manner that allows them to dry.
How Does Moisture Get Into Walls?
There are four common ways walls get wet:
1. Bulk water leaking into the wall:
This could be from exterior rain or snow events or from an interior water leak from plumbing or a tub and shower assembly.
2. Moisture vapor carried by air flowing through the wall:
Air pressure differences caused by wind, stack effect (warmer air rising and colder air falling), or mechanical systems often force air through incidental holes or gaps in the wall assembly, and perhaps moisture with it. Warm air has greater capacity for moisture than cold air, so when warm air is cooled, the relative humidity of the air rises and risks condensation. Condensation depends on the air’s temperature and humidity level and how cool the air will become while it’s still in the wall assembly. If the air cools sufficiently, it may reach dew point (become saturated with water). If this condition occurs inside a wall, the vapor will condense on the cool surfaces inside the wall, such as the back side of the exterior sheathing (during heating conditions) and wal-ah, you have a moisture problem.
3. Moisture vapor passing through permeable layers in a wall assembly (aka vapor diffusion):
Yes, moisture vapor can pass through solid materials ... because most materials aren’t as “solid” as they appear to be. How easily this occurs depends on the material’s permeability and the force of the vapor drive (the natural tendency for moisture vapor to diffuse from wetter to dryer areas). Between diffusion and air transport, the latter is a greater threat.
RELATED
- How to Frame Walls That Combat Moisture
- Building Science: Understanding Moisture Flow
- Building Envelope Moisture Control for Mixed-Humid Climates
- Building Envelope Solutions for Moisture ManagementBuilding Envelope Solutions for Moisture Management
4. Capillary action:
When porous materials (wood, masonry, others) become saturated with moisture, the moisture will continue to travel through the material until it runs into an impenetrable barrier. Such barriers are referred to as “capillary breaks.” Cementitious materials or stone materials don’t mind being wet and do a great job of storing moisture, releasing it as vapor into the air. However, some materials, such as wood, don’t like being wet, at least not for extended periods. The combination of wood with sufficient moisture is a great meal for microbes to feed on and for mold to grow.
Effective Moisture Management Strategies for Walls
To manage bulk water:
First and foremost, address exterior water leak potential. After that, a well-installed weather resistive barrier (WRB) is critical, and all flashing components at windows, doors, and penetrations must be installed with excellent attention to detail. Anywhere water will sit for extended periods of time, such as parapet wall caps, recessed windows, or pot shelves, requires the additional protection of a waterproof membrane. A WRB is intended to shed bulk water, but it can’t be waterproof because it must also be vapor-permeable. Well-installed WRBs are important in all climate zones.
To manage vapor carried by airflow:
Make wall assemblies as airtight as possible using redundant air-barrier strategies.
On the interior, use the drywall as an air barrier. To do this, you should:
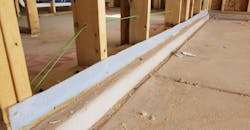
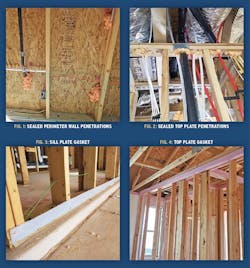
• Install a top-plate gasket for all interior and exterior walls and sill-plate gaskets for exterior walls.
• Caulk all penetrations through the plates and chases.
• Foam the openings at the back of electrical boxes.
• Caulk all penetrations through the drywall at the walls and ceiling.
On the exterior, use housewrap or another well-sealed WRB as an air barrier.
• Seal all penetrations through the WRB with the specified sealant or tape. When using housewrap, ensure all windows, doors, and other penetrations are integrated in a shingle-flashed fashion with the WRB.
• Seal all of the seams in the WRB with tape or fluid-applied membrane.
In addition to all of this air sealing, it’s a good idea to manage the air pressure within the building enclosure with respect to outside. If air is to be forced through a wall due to the pressure difference caused by mechanical or passive ventilation, you want the greater pressure to be on the cooler side of the walls so air is being driven from cold to warm to avoid condensation.
Therefore, in predominantly heating climates, homes should be under slightly negative pressure using an exhaust ventilation strategy and in predominantly cooling climates, homes should be slightly pressurized using a dilution strategy (fresh air pumped into the home). Regardless, the best practice in any climate is to use a balanced, whole-house fresh-air ventilation strategy.
RELATED
- Moisture-Control Techniques for Wood-Framed Homes
- Moisture Management to Prevent Mold
- Tips for Choosing the Right Housewrap
To manage vapor diffusion:
Become a student of the following fundamentals:
• Moisture moves from warm to cold.
• Vapor diffusion is less of a threat in moderate and dry climates.
• In heating climates, the threat of condensation is to the exterior side of the wall cavity.
• In cooling climates, the threat of condensation is to the interior side of the wall cavity.
• The more permeable side of a wall system should be to the predominantly cooler side.
• The drying capacity of a wall assembly must be greater than its wetting potential.
• Learn how to read psychometric graphs (they aren’t as difficult to understand as they first appear), as they inform the potential dew points for air at a given temperature and relative humidity levels.
• As long as vapor passing through the wall doesn’t come in contact with surfaces that are cooler than the dew point of the air, the vapor will not condense but will continue to move through the wall assembly without causing harm.
When porous materials (wood, masonry, others) become saturated with moisture, the moisture will continue to travel through the material until it runs into an impenetrable barrier.
To manage capillary action:
• Use capillary breaks between all materials that store water (concrete, stucco, stone, etc.) and materials that don’t like being wet for extended periods of time, such as all wood and engineered wood products. Even cementitious sidings should be isolated, to reduce swelling and paint blistering.
• Consider installing a capillary break between the spread footing and foundation walls for basements and crawlspaces.
• If permitted, pass your under-slab vapor barrier under the footings and grade beams to keep from adding ground moisture into the foundation.
Graham Davis drives quality and performance in homebuilding as a building performance specialist of the PERFORM Builder Solutions team at IBACOS.

