


By virtue of visibility, drywall cracks in walls and ceilings can determine a homeowner’s perception of your construction quality. The truth is, most of those cracks indicate only a surface-level issue. But, like a typo in your favorite magazine, those little fissures undermine an owner’s opinion of overall quality and of your attention to detail. If you can’t get the drywall right, what else have you missed?
How to Prevent Drywall Cracks
Hanging and finishing drywall may not be the trickiest task in home building, but it does require skill and training. Materials selection is more specific than you may think, and workers need to follow a progression of steps to get it right and to mitigate (if not eliminate) those unsightly cracks—and the time and cost to fix them.
RELATED
- How to Avoid Drywall Problems From Truss Uplift
- Details Matter: How to Hang Drywall in the Proper Direction
- A Checklist for Building Party Walls the Right Way
- Cracking the Code of Drywall Cracks
Consider mud—and forget lightweight compounds. General-use or chemically setting compounds offer better adhesion, more control, and a harder surface. Fast-drying formulas may enable same-day finishing, which likely balances the cost difference for a higher-grade compound.
Meanwhile, years of addressing ceiling cracks has spawned better wallboard installation practices that allow the panels to “flex” a little with the structure. For long, uninterrupted ceiling planes, especially, the best practice is to fasten metal furring channels perpendicular to the ceiling joists to suspend the drywall by about an inch. Doing so effectively separates the drywall panels from direct contact with the roof framing, which reacts differently to climate conditions.
Another option is to design and build soffits to break up a large ceiling plane and minimize those long uninterrupted areas, which also better defines rooms within such floor plans.
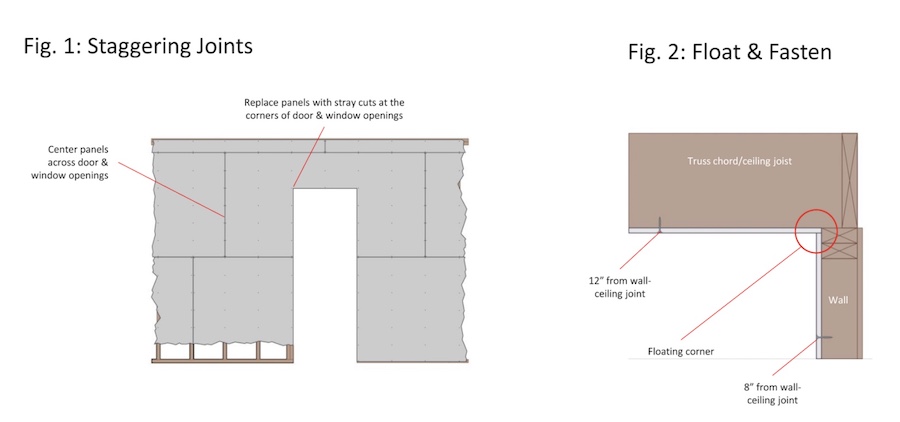
It’s also critical to let the wall-ceiling joint “float” by securing fasteners 8 inches down the wall and 12 inches along the ceiling from that connection. Install the ceiling drywall first, so the intersecting wall panels support that edge against sagging. For additional assurance, try truss and drywall clips at the corners and consider stiffer ceiling-rated boards.
Finally, here’s an easy one: Watch for stray cuts that extend beyond the framing when you rout out a drywall panel to expose a rough opening. If stray cuts happen, replace the panel and coach the cutter. Install one piece of drywall that saddles the top of windows and doors so that both the left and right sides of the panel end at least 6 inches beyond the rough opening. Use the illustration (above) and follow this best-practices checklist to mitigate drywall cracks in walls and ceilings.
Best-Practices Checklist to Mitigate Drywall Cracks
1. Stagger the joints: Stagger the panels, and avoid aligning the drywall's panel joints with window- and door-framing members.
2. Screw it: Screw-fasteners hold drywall better than nails. Use those recommended by the wallboard maker per panel thickness.
3. Protect the paper: Drive fasteners to hold the wallboard in place without breaking the paper facing (especially at edges) or sinking fasteners too deep into the core.
4. Let it move: Hold back fasteners no less than 8 inches down the wall and 12 inches along the ceiling from wall-ceiling joints to enable “floating” corners; consider control joints, channels, or clips.
5. Know your mud: Use general-purpose or dry-mix joint compound and avoid using it to fill gaps beyond the width of a control or panel joint, which can cause bubbling.
6. Sand lightly: You should only have to lightly sand the second (maybe) and top coats of compound to get a smooth, flat surface.
Richard Baker is program manager of the Builder Solutions team at IBACOS.
Advertisement
Related Stories

Quality Matters
5 Ways to Silence Squeaky Floors
Take these tips to heart to deliver quiet floors and satisfied homeowners
 within the thermal enclosure may seem like too much work, but you'll find the benefits far outweigh the effort required to do it. | Image: courtesy IBACOS")
Quality Matters
Tips for Placing HVAC Ducts in Conditioned Space
See how putting HVAC ducts inside conditioned space in a home benefits both the builder and the homeowner

Quality Matters
Don't Underestimate the Importance of Roofing Underlayment
Regardless of which product you choose to use, installing a roofing underlayment will help ensure the roof system withstands the elements and the home stays dry

